| Back rank mate |
 |
|
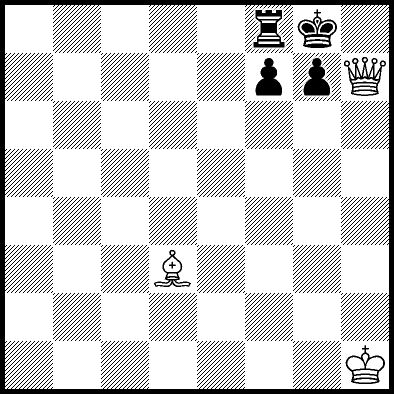
| Queen and bishop mate |
 |
|
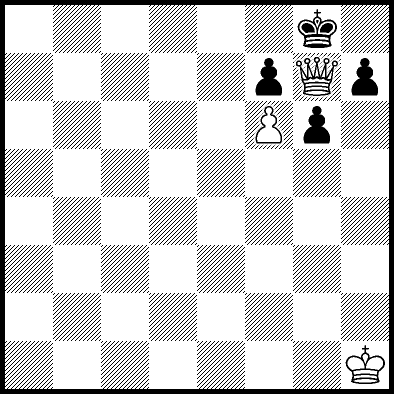
| Queen and pawn mate |
 |
|
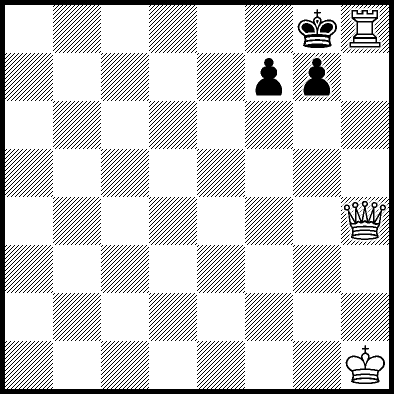
| Queen and rook mate |
|
|
|||||||
|
|
|||||||
Hopefully the above four checkmate positions are familiar to you, and you already watch out for them in your games. The point of this lesson is to show you some less common checkmates, so that:
 |
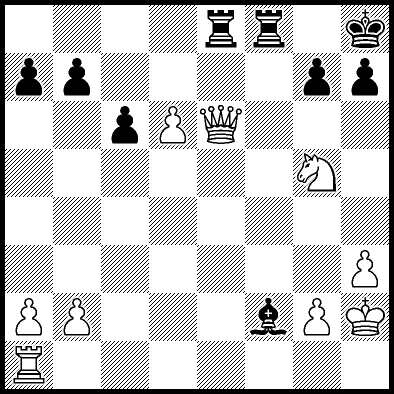
| White to play and mate |
1. Qxh7+ Kxh7
2. Rh5+ Kg8
3. Rh8#
The idea of a rook or queen in the corner of the board supported by a bishop on the long diagonal happens a lot. If you have to advance a pawn in front of your king (for example, to prevent back rank mate) it's usually a bad idea to move the middle pawn if your opponent has a bishop on the long diagonal.
 |
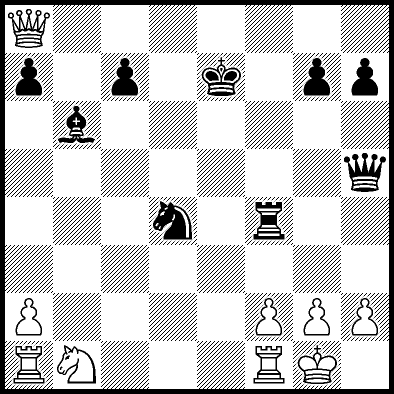
| White to play and mate |
1. Nf7+ Kg8
2. Nh6+ Kh8
3. Qg8+ Rxg8
4. Nf7#
Surprisingly for such a dramatic checkmate, this pattern of queen on the a2-g8 diagonal and knight attacking f7 happens a lot. It's just one jump for a knight on f3 to attack f7, and Black often moves his f-pawn to attack the centre.
Note that Black can't take the knight on his first move because it walks into a back rank mate. This idea of combining a simple checkmate with one of these less common ones is a good tip to bear in mind when you're planning combinations.
 |
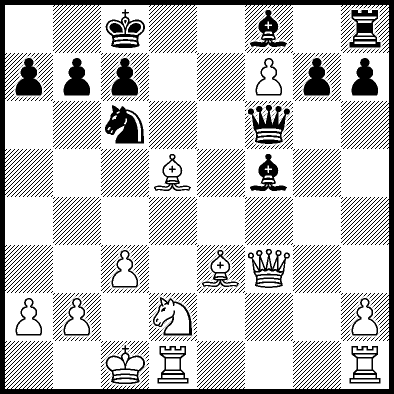
| Black to play and mate |
1. ... Ne2+
2. Kh1 Qxh2+
3. Kxh2 Rh4#
This checkmate doesn't come up very frequently in practice, but is still a useful pattern to remember because there are many similar ideas. In particular, the knight check forcing the king into the corner is often useful: in the endgame it can gain a valuable tempo since the king must waste time coming back into the centre.
 |
| Black to play and mate |
1. ... Qxc3+
2. bc Ba3#
Again, this rarely comes up in practice, but the idea of a bishop restricting the movement of a king that has queenside castled is a useful one to remember.
Note: all of these problems feature queen sacrifices, but that's not really important. Instead remember the arrangement of pieces in the final mating position, and in your own games plan how you can get your own pieces onto the right squares. If that plan involves a queen sacrifice then you'll almost fall off your chair in excitement, but in practice quieter moves are usually stronger.